Importing School Performance Data to SASPAC
In this example, we will import the Newham primary school performance data into SASPAC for the data to be
analysed and mapped against other datasets existing in SASPAC and MapShore. The first step is to ensure
that the school performance data are in the correct comma-delimited (CSV) format. The CSV file can then
be converted into a system file using the "Editor" command in SASPAC.
Preparing Data in the Correct CSV Format for SASPAC
The first preparatory step is to get the new attribute data into a format that can be linked with other
standard census statistics in SASPAC. This involves converting the data from a CSV file into a system
file (.SYS) in SASPAC. The conversion requires the zone code to be the first column of the data followed
by optional zone labels. The remaining data must be numeric which can be either integer or decimal
values. All the character strings, including the field labels, must be enclosed by pairs of double
quotation marks, e.g. "ZONEID". SASPAC requires that all field labels are a maximum of eight
alphanumeric characters and must not contain spaces or other special characters.
As Output Area (OA) level school performance data have already been generated and exported as a CSV file
in previous steps, you will only need to check the data format and rename the variable names. If you did
not attend the workshop or complete the prerequisite steps before reaching this part of the exercise,
you can click [here] to download the
CSV file.
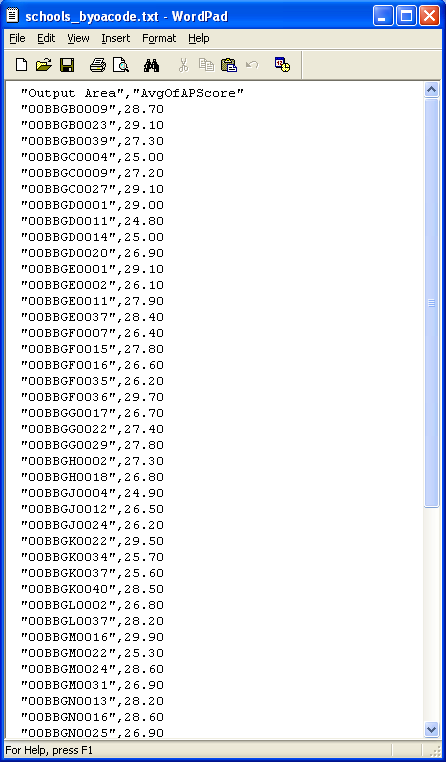
Use a text editor (e.g. Micorsoft WordPad) to open "
_byoa.csv" which should have been saved to the local working folder. The file should have two data
columns separated by a comma. The first column is the zone identifier (ZONEID) whereas the second column
contains the average KS2 point score of all the primary schools in an OA.

Simplify the variable labels to make them compatible with SASPAC (i.e. maximum 8 letters without spaces
or special characters). For example, "Output Area" could become "ZONEID" while
"AvgOfAPScore" could be renamed as "KS2SCORE". Save the file as "
_byoa_saspac.csv" before exiting the text editor. The file can now be used for creating a new
SASPAC system file.
Creating a new SASPAC system file from a CSV file
Start SASPAC. Close the Quickstart task menu if it is launched. Select File > New Task > Editor to
open a new command file editing window. In this editor window, input the following text exactly except
for {PATH} where the text should be replaced by the actual folder location of
the input and output files.
INPUT csv file with headers name = "{PATH}\
_byoa_saspac.csv"
READ ZONEID KS2SCORE
SET DSYEAR 2007
SET DSNAM SCHOOLS
SET DSLAB 2007_SCHOOLS_BYOA
SET ZONEYEAR 2001
DESCRIBE variable KS2SCORE DP=2 label = "KS2 Point Score "
OUTPUT system file name = "{PATH}\
_byoa.sys" label = "KS2"
END
FINISH
|
Each line of input above begins with a SASPAC command. The commands may then be followed by keywords
(e.g. DSYEAR, DSNAM, DSLAB and ZONEYEAR), variables (ZONEID and KS2SCORE) or file location and name.
ZONEID is mandatory whereas KS2SCORE is a user-specified input. The variable description at line 7 (line
beginning with the DESCRIBE command) is optional but is particularly useful in providing additional
information about the data, e.g. the variable label, the number of decimal places for non-integer
numbers (DP=?), etc. Please refer to the SASPAC User Manual for further details.
Click Save and then input "
_byoa" in the File name: box before clicking Save. When prompted, click Close File and Run Task to
start the CSV to SYS conversion process. If the commands are completed successfully, the "****
SASPAC RUN COMPLETED SUCCESSFULLY ****" message should appear on the screen.

N.B. If the SASPAC command file (.CMD) does not run successfully and the process ends with an error
message, scroll up the window to look for the error source. Make sure all the command lines are
correctly spelt and spaced and the input CSV file is of the right format and in the right folder
location. To make any corrections to the CMD file, close the current window and select File > Open
> Open Command File... and navigate to the location of the .CMD file (either in the default location
at "C:\SASPAC\COMMAND\" or in the user folder chosen during previous steps.) Make the
corrections and then repeat the steps in the paragraph immediately above to complete the task.
The CSV import process will now create a customised SYS file from which the new area attributes ("KS2SCORE")
can be linked with any other standard census variables available in SASPAC. The linked results can also
be mapped using MapShore.
Copyright Attribution
The Small Area Statistics Package (SASPAC) software is owned by the Improvement and Development Agency
for Local Government (IDeA). MapShore is a registered trademark of Pebbleshore Ltd and WordPad is a
registered trademark of Microsoft Corporation. The software screen shots shown in this page are
reprinted with permission from IDeA and Microsoft Corporation.

 Homepage
  Geographical Referencing Learning Resources
